Ludum Dare 55 is now in the rearview. Before it started I got together with Simon, the other programmer for Windmill Games' (https://windmill.games), to chat about potential game ideas. We had an idea for a spell-casting game that would work for a lot of different themes, and we wanted that spell-casting mechanic to operate with the user drawing on the screen.
Ludum Dare 55 started at 3am for Simon, so he went to bed beforehand so he could wake up a little after start time feeling 100%. Before he left, we joked - as we always do - that the theme is never one that we plan for, or even like. Still, I couldn't get that idea of drawing shapes for spells out of my mind.
9pm EST rolled around and the theme was released. To my surprise and elation, we got both a theme we planned for and liked! Our spell-casting idea was perfect for the chosen theme - Summoning. Knowing that we wanted this drawing mechanic ahead of time, I was able to get started on this system almost right away.
Visit the LDJam page if you participated in Ludum Dare 55!
I was in a Discord call with some of my non-gamedev friends when the theme was released, and I posed the question of how one would implement this to get the ball rolling in my brain. The first thing that came to their minds, which I sort of anticipated as being their answer, was to "just throw a simple ML model at it." I didn't want to take that approach for two reasons - I wanted to implement this system myself from scratch, and even if I didn't, I would have certainly taken way more time trying to cram any sort of ML model into Love2D than would have been worth it.
I knew I was going to convert mouse movements in to a list of XY coordinates, and then somehow compare that to a bank of known shapes. I formulated a plan to create a bank of "known shape templates" which would act as the possible spells the player could cast. I would then take the points the user has drawn and iterate over each shape-template and compare the points somehow. Whichever template had the closest "fit" and was within some "closeness threshold" would be the one chosen. How I was going to get there? No clue, at this point.
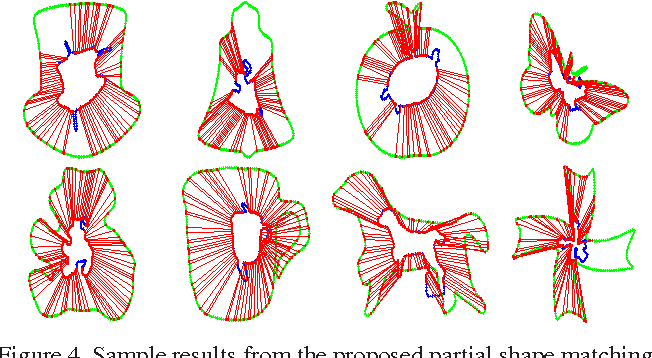
This picture I found on Google (actual source) I feel inspired me the most to continue with the approach I did, which I explain in detail further on:
A prompt to ChatGPT along the lines of "how to compare shapes to a bank of known paths" lead me to the Ramer-Douglas-Peucker Algorithm. (I want to note that this was the only time an AI was involved in the process; once I was pointed in this direction I closed the chat window and never looked back.) This algorithm I came to learn is one that can take a curve and "simplify" it into a similar curve with fewer points. This seemed like a great starting point, as I knew I didn't want to be comparing shapes with hundreds or thousands of coordinates. I found an online playground for the algorithm which was instrumental in my understanding of how it worked and proving its viability as a component of the system.
Here's an animation of the algorithm in action, which I found here:
Next, I started researching online and came across a couple of research papers about shape recognition. I skimmed them for the most part, using what I saw in the images and text (that I could understand without a degree in this stuff) to solidify my idea. A list of honorable mentions from my research:
I began an attempt to implement the Ramer-Douglas-Peucker algorithm myself, but after struggling to recall the trigonometry required to actually perform the operations required, I went searching for a premade solution. I was elated when I discovered fortunes were in my favor - GitHub user evaera had created a Lua implementation with easily configured parameters. I slotted it into our minimal LD starter code kit and refactored a couple of things to get it to expose the method in a way I was comfortable with.
How It Works - Overview
In the source code exists a set of pre-made drawings I drew, whose X and Y coordinates are between 0 and 1 (a "unit square"). To compare the shapes:
Mouse movements are captured into a list of XY coordinates, in screen-space
Screen-space coordinates are passed into an algorithm to simplify the shape to make further computations easier
List of simplified coordinates is normalized into a unit square
The list of pre-made drawings is iterated over. For each shape, the points of the user drawing are scored on their proximity to points within the template. The sum of these proximity scores is the "similarity score" for that specific pre-made drawing.
The pre-made drawing with the lowest similarity score is chosen, contingent on that score being lower than a sensitivity threshold.
But how did I get it working with real code? What are the specifics? Keep reading to learn all about it!
How It Works - The Nitty Gritty
Calculating the drawn path
I knew going into this that the shape-templates would need to be standardized somehow, so I made the decision for all shapes to exist within a square whose points are (0,0), (0,1), (1,0), (1,1) - I'm calling this the unit square. I created a bank of simple shapes - a square, a triangle, and a diamond (just a square rotated 45 degrees).
With that, I then wrote some code to capture mouse movements into a list of coordinates and draw that list of coordinates to the screen. I then passed these coordinates into the Ramer-Douglas-Peucker algorithm, and used the same path-drawing mechanism to show me the simplified path.
Remember that at this point, the coordinates are in screen space, meaning if you draw it in the middle of the game window (which is 1920x1080), your shape starts at around X=900 and Y=500, and maybe a few hundred pixels wide/tall. To get the now-simplified path to fit within the unit square, we iterate over the points to find the minimum and maximum values for both X and Y coordinates. The minimum value (which in Love2D's coordinate system is the left-most value on the X axis, or the top-most point on the Y-axis) thus acts as the "offset" value, which needs to be corrected for. The maximum value subtracted by the minimum value yields the "range" of points in the respective axis, which I call xscale and yscale in the code. We then map all of the points of the simplified path, taking each point's X and Y coordinates and subtracting the minimum value for that axis to correct for the offset, then dividing it by the correlating scale to get the values in a range of 0 to 1. This has the benefit that the user doesn't need to draw the shape in any particular place on screen, or even of a particular size; it's all normalized regardless of where and how it's drawn.
If that didn't make sense, here's the code for that portion; maybe just seeing it makes more sense. It's a snippet from a "class" (I use GitHub user evolbug's tiny clasp library) called Path that I wrote to contain this stuff:
1:
toSimpleNormal =function(self)
2:
local simplePoints =simplifyPath(self.points, SIMPLIFY_TOLERANCE)-- Ramer-Douglas-Peucker
3:
local simplePath =Path(simplePoints)
4:
5:
local minx, miny = math.huge, math.huge
6:
local maxx, maxy =0,0
7:
simplePath:forEachPoint(function(point)
8:
minx = math.min(minx, point.x)
9:
miny = math.min(miny, point.y)
10:
11:
maxx = math.max(maxx, point.x)
12:
maxy = math.max(maxy, point.y)
13:
end)
14:
15:
local xscale = maxx - minx
16:
local yscale = maxy - miny
17:
18:
local simpleNormalPath =Path()
19:
simplePath:forEachPoint(function(point)
20:
local px =(point.x - minx)/ xscale
21:
local py =(point.y - miny)/ yscale
22:
23:
simpleNormalPath:addPoint(px, py)
24:
end)
25:
26:
return simpleNormalPath
27:
end,
And here's an example screenshot from development that shows a drawn shape in white, and its normalized counterpart in yellow. The blue shape is the first template I coded up, which was there to prove that normalized shapes were located and scaled correctly.
Comparing the drawn path to the templates
Before I hit you with a wall of text and math, here's a screengrab from development which illustrates what we're working towards. I find this helpful to refer to to help follow along with the calculations and logic being performed:
Okay - with the drawn path now normalized into a square, we need to compare it to the templates. The drawn path is stored as an array, so to start we take the point at position 0 in that array - let's call that P_0. Then, we iterate over every single point in the template and calculate the distance between the two. If the distance is smaller than the previous-smallest distance, that template point is chosen instead. Once we're out of template points, we're left with the point nearest to P_0 - let's call it T_anchor.
The distance between P_0 and T_anchor is returned and added to a variable called totalDistance. Actually, the square of the distance is returned, which helps penalize points that are further away. Because all points exist with the range in the range of 0-1, our distances are guaranteed to be somewhere between 0-1, essentially always being a decimal value. A decimal value squared always becomes smaller, but not in a linear fashion. To illustrate: a distance of 0.1 becomes 0.01 - a ratio of 1/10 - whereas a distance of 0.5 becomes 0.25, a ratio of 1/2. Since larger distances mean a worse score overall, smaller distances thus have less impact on the totalDistance than large ones do.
Returned alongside the distance value is T_anchor's position within the template path (i.e., its index). This is important, because for all points after P_0 in the drawn path (P_1, P_2, ..., P_n), we only search for points in the template immediately to the left or right of T_anchor. If one of these adjacent points is determined to be nearest, it becomes T_anchor for the next iteration. This extra bit of nuance is the glue that keeps the system together when analyzing paths that cross over itself, like the "&", by ensuring the points are compared in a continuous way.
A screenshot I took early in development, before this left-and-right check was implemented, may help to visualize the problem:
While the shape was correctly identified in this example, note how in the furthest-right example, the midpoint of the hourglass-looking shape is associated with many points that aren't connected to each other in the drawn path. The diamond and square shapes are also poorly recognized, with the corners being completely ignored. I found this ultimately has the effect of skewing the totalDistance in a way that makes a misrecognition more likely.
Alright - we now have accumulated distance values for each of this template's point into a totalDistance. Unfortunately, we're not quite done. Even with the left-and-right mechanism in place, I was seeing that many points in the template path weren't ever being chosen as the nearest point - essentially they weren't ever considered. This is somewhat expected as the shapes are quite different from each other, so not every point will have a "nearest" point continuous to the previous. However, it posed a problem - a drawn path that is very close to many points in one template may actually have a larger totalDistance than another template where not every point is used. This was a big source of misrecognition, so I decided I needed to penalize missing points, and it wouldn't be a minor penalty. I theorized that if you aren't hitting all the points in the template, you're likely not attempting to draw that template. I added a mechanism to count the number of points in the template that weren't used at all. Similar to how I wanted small distances to be penalized less than larger distances, I wanted the penalty to grow exponentially as the number of missing points grew. I arbitrarily decided to cube the value of missing points, which worked out well. Thus:
0 points missing = 0 added to totalDistance
1 point missing = 1 added to totalDistance
3 points missing = 27 added to totalDistance
5 points missing = 125 added to totalDistance
...and so on.
The adjusted totalDistance is returned and associated with the template path that was being evaluated; we then repeat the evaluation process for every template path. Comparing each template's totalDistance with the others, we can find the smallest totalDistance - let's call that D_smallest - and the correlated path with it. We have finally found the template path that is "closest" to the one the user drew. Before we declare victory on this problem, we perform a quick check to ensure that D_smallest is less than a threshold value, ensuring the user must have drawn something close enough to one of the templates. Otherwise, even a random scribble would be recognized as a shape. This threshold value was determined by trial-and-error and tuned throughout development.
Phew. We're finally done though! With this system in place, we can get to actually integrating this into the game.
Just in case you're interested, here's the code for this process. Note that this method is run against all nine templates in the game each time you draw something:
-- Edge case - doesn't actually happen but I need to put something here
17:
totalDistance = totalDistance + math.huge
18:
end
19:
end)
20:
21:
local unusedPointCount =#other.points
22:
for _ inpairs(touchedPointIndexes)do
23:
unusedPointCount = unusedPointCount -1
24:
end
25:
26:
local adjustedTotalDistance = totalDistance +(unusedPointCount ^3)
27:
return adjustedTotalDistance
28:
end,
How Did We Decide On The Shapes?
Oh! A quick note about how the templates were generated. Originally I was writing them by hand, calculating the decimal positions and entering them manually to describe the shape. As development progressed, however, I patched in a shortcut. When I drew a shape in my testing playground, the simplified+normalized result of what I drew was copied to my clipboard. I essentially then just drew shapes I felt I liked, put them into a file to be loaded by the game, and then tested how well it could be recognized.
At one point Simon and I got together on a call and just streamed Paint.NET to each other and drew shapes to see what we came up with. Here's a collection of some of the shapes we came up with in that session:
Simon, who I think had been programming for 14-15 hours at this point, was so tired. Out of nowhere he quietly goes "...what about this" and shows me this:
If only we could've gotten that in there as an easter egg or something.
Integrating Path-drawing Into The Game
Simon wrote the player code, including the actual activity that occurs when spellcasting. It was my job to take what he wrote and tie it together using this shape-recognition system. Compared to what we just went through, this was a walk in the park. There's a SPELLS object that says "hey, if you draw the & shape, invoke this spell".
I created a class called Spellcast. Under the hood it has a Path instance that gets points inserted into when the user is drawing a shape. The Spellcast class can read those points and draw them to the screen. When the user stops drawing, the path in memory is compared against all the templates, and if one is found, the spell correlated with that template is invoked. After this, the path in memory is cleared for the next drawing session.
I created another class, PathAnimator, which can take a Path and animates it. This is how you can see the spell path "tutorial" appear when you hover over cards. Here's how that looked early on:
You can see that at this stage I had already implemented a camera effect and time-slowdown that occurs when casting a spell. At this point, I felt it was really hard to see the tutorial, and that it was a burden for players to use because they essentially had to stand around to wait for the tutorial to finish, making them a defenseless target for the enemies to attack. This is where I decided to implement essentially the same camera-zoom + time-warp combo when inspecting a spell. I'm glad I did this - in reading comments on the Ludum Dare page for the game, people have mentioned their appreciation for that mechanic. Plus, I think it just looks cool.
Conclusion
The system definitely has its flaws. In every playthrough I've watched, the player inevitably has issues drawing at least one of the shapes. Part of it is due to the normalization over-correcting shapes that have straggly bits on the edges - I've seen this happen most with the &, when the player really goes for the flourish at the end and draws a super long line to finish it off. Part of it is actually the Ramer-Douglas-Peucker algorithm; because it simplifies paths and removes points, straight lines become so simple that they become hard to work with in the distance-finding algorithm. This is why all the shapes are relatively "swoopy".
In any case, I'm extremely proud of the fact that I not only pulled it off but pulled it off in such a visually pleasing way, and in such a short amount of time. Going into it on day one, the challenge felt insurmountable, but I was able to come up with something that works, if not really well, well enough - which is enough for Ludum Dare!
I'm also incredibly happy to have contributed a major gameplay mechanic to a game for Ludum Dare. At risk of discounting my contributions to other games, I would say I typically take a role of what I would describe as "visual direction" or "game system integrations" for these jam games. I think I have a knack for how these kinds of games should fit together, so I've honed that niche over the years. This time, though, I put my nose to the grindstone and delivered something that was foundational to the gameplay, and I'm beyond pleased with my execution of it.
All I can do is hope that when you are playing it, you are too!
-ezb
PS - Thanks to the entire Windmill Games team for helping to make Blakulla as great as it is. Simon is a wizard programmer who makes player control and enemy AI look effortless. Belle is simply magical with her artistic abilities - I always think she has outdone herself but then she goes and does it again on the next game. Daniel is a musical genius as always and really knows how to set the tone for our games. And this time around we had a new SFX person, Felipe, who knocked it out of the park with work is just astounding in my opinion. I love everyone I get to work with and I love everything that we've made. I'm beyond lucky to be able to work with such an amazing team <3